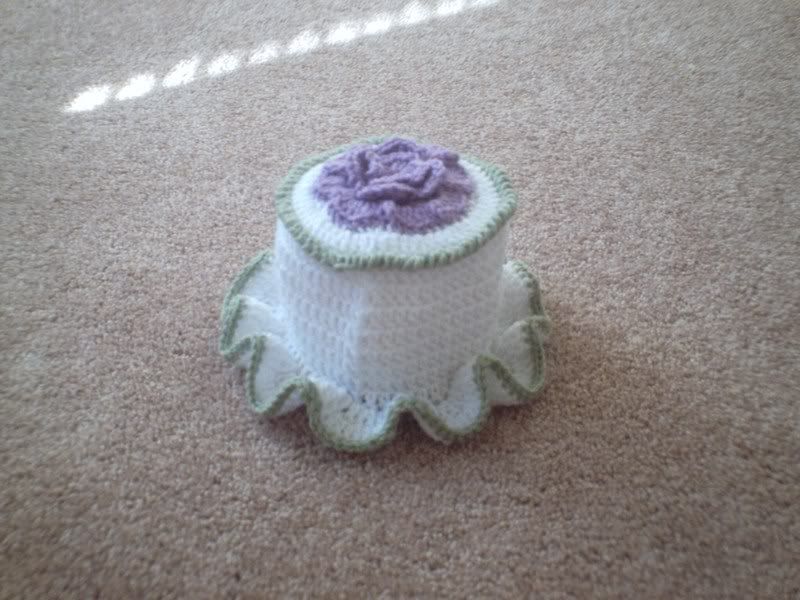
"Victorian Rose" TP Cover

This is one of the very first things I ever crocheted without a pattern, when my husband and I got our first apartment together. (I don't think we were married yet....We've been married for 16 years so this is about 17 years ago...) I was decorating our bathroom with a green, burgundy flowered shower curtain ('victorian rose'), hunter green and burgundy towels. I had the burgundy toilet tank and seat cover, complete with the rugs.... :P Well I never did write down how I did it and the only picture I have of it, it is laying on the back of the toilet all flat. :( But I remember what it basically looked like. And I wanted to try making one again. (Especially since I joined the 'Kitsch as Kitsch Can CAL'.) :P I made my original tp cover with hunter green trim, and a burgundy flower but I didn't have any so I did it in what my husband calls 'modern' colors. So here goes:
Note: This is for a double roll of toilet paper.
FLO= Front Loops Only
BLO= Back Loops Only
Note on hook size: I noticed on the second one I made, that it looked a little loose. So depending on how tight you crochet, you might want to go down a size, to a G hook...) :-)
H hook
WW yarn small amounts for trim and flower about a half a skein (?) for the actual tp cover
Ch 4, join w/ sl st to make a ring.
Round 1: Ch 3, 15 dc in ring. (16 dc)
Rnd 2: Ch 3, dc in same space. *2 dc in next dc. Rep from * around. (32 dc)
Rnd 3: Ch 3, dc in same space. *Dc in next dc, 2 dc in next dc. Rep from * around, ending w/ a dc in last st. (48 dc)
Rnd 4: Ch 3, dc in same space. *Dc in next 2 dc, 2 dc in next dc. Rep from * around, ending w/ dc in last 2 dc. (64 dc)
Rnd 5: (Work in BLO for this round) Ch 3, dc in each dc around. Join.
Rnd 6: Ch 3, dc in next 8 dc.*Dc next 2tog, dc in next 9 dc, rep from * around. (59 dc)
Rnd 7-12: Ch 3, dc in each dc around. Join. (Last round should sit just above the bottom of the tp roll.)
Rnd 13: (Work in FLO for this round) Ch 3, dc in same space, 2 dc in each dc around. (118 dc)
Rnd 14: Ch 3, dc in same space, *dc in next dc, 2 dc in next dc. Rep from * around. (178 dc) Fasten off white. Join black (or contrasting color of choice) in any st. Ch 1. Sc in each st around. Fasten off & weave in end.
Join black in remaining loop of round 5. Sc backwards all around. Join. Fasten off & weave in end.
Rose:
Ch 5 join to make a ring.
Rnd 1: Ch 1, sc in ring. *Ch 2, hdc, dc, hdc, ch 2, sc. Rep from * three more times (4 petals). End w/ a ch 2 & join w/a sl st to first sc.
Rnd 2: Ch 1. Sl st to back loop of sc. Sc in same space. *Ch 3, sc in back loop of next sc. Rep from * three times. Ch 3, join w/ a sl st to first sc. (four ch 3 loops)
Rnd 3: Sl st to ch3 space. Ch 1 (sc, ch 2, hdc, 3 dc, hdc, hdc, ch 2, sc) in each ch 3 space around. Join w/ sl st to first sc.
Rnd 4: Ch 1, *sc in back loop of sc from previous round. Ch 3, sc in between 3nd & 3rd st of round 3. Ch 3, rep from * end w/ sl st to 1st sc.
Rnd 5: Sl st to ch 3 space. Ch 1, (sc, ch 2 hdc, 3 dc, hdc, ch 2, sc) in each ch 3 space around. Join w/ sl st to 1st sc. Fasten off leaving a long enough tail to sew flower onto top of tp cover.
Put onto your toilet paper roll.
posted by Tina at
9:40 PM
|
2 comments
![]()


