Tina's Crochet Page- This is a blog where I keep all my patterns

Saturday, July 16, 2016

Square For The Boho Bag I Crocheted


Square for Boho Bag I Crocheted
I used an H hook, scrap amounts of red, navy blue, orange, pink, and light blue. You could use any scrap color combination you like or all one color. Note: I work over ends as I go so I don’t have to sew them in later. This square is not to be copied or sold, it is a free pattern to make the Boho Bag on five sixteenths blog: http://www.fivesixteenthsblog.com/2... This pattern has only been tested by me. So it may not be completely reliable. :P
Round 1: With red, ch 5 and join to make a circle. Ch 4. *dc, ch 1, repeat from * 14 more times. Join to 3rd chain of beg ch 4. (16 dc and ch-1 spaces). Fasten off red.
Round 2: With navy blue, join with a sl st in ch-1 space. Ch 2, dc in same space. (Beginnning cluster?) *Ch 2, 2 dc cluster in next ch-1 space, repeat from * around. Ch 2, join with sl st to top of first cluster. (16 clusters and ch-2 spaces.) Fasten off navy blue.
Round 3: With pink, join with sl st in ch-2 space. Ch 3. 2dc in same space. 3 dc in next two ch-2 spaces. In next space, 2 dc, ch 2, 2dc (corner made). *3 dc in next ch-2 space three times, in next space make corner. Repeat from * two times. Join with sl st in top of beginning ch-3. Fasten off pink. You now have a square.
Round 4: With orange, join with a sl st in any corner space. Ch 3, dc in same space. Ch 2, 2 dc in same space. (Beginning corner.) *Dc in each dc up to next corner space. Corner in next corner space. Repeat from * two times. Dc in each dc up to first corner. Join with sl st in top of beg ch-3. Fasten off orange.
Round 5: With red, repeat row 4. Fasten off red.
Round 6: With navy blue, repeat row 4. Fasten off navy blue.
Round 7: With light blue, join with a sl st in corner space. Ch 1, *sc in same space. Ch 1, sc in same space. (Corner made)Sc in each dc up to next corner. Repeat from * three times. Join with sl st in first sc. Do not fasten off light blue.
Round 8-9: Sc in each sc, corner in each ch-1 space. Join. After round 9, fasten off light blue.
Round 10: Repeat round 8. Fasten off pink. You might want to leave a really long length to sew the squares with later, but that’s up to you.

Friday, February 27, 2015

Tea. Earl Grey. Hot.

H hook
Red Heart or other worsted weight yarn: Red (or your favorite star trek suit color!), black, small amount grey
yarn needle

Row 1:  With black, Ch 13. Sc in 2nd chain from hook and each chain across. Ch 1, turn.
Row 2:  Sc in each sc across. Ch 1, turn.
Rows 3-26: Repeat row 2, change to red in row 5 by pulling up red in the last loop of last sc on row 4. Change back to black in the same manner at the end of row 22. (You might want to leave a length of  the red, to sew the pouch up with later). Work four rows black.  FO, leaving a length of black to sew up the pouch. Matching the black to black, and red to red, sew up the sides.

Com badge:  I just did surface crochets to make a V, then weaved in the ends inside.  

Friday, July 08, 2011

Simple Circle Earrings

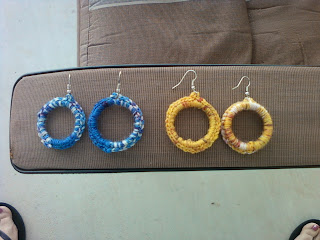
Here are the materials I used.  :)
"B" crochet hook
Sock yarn (almost fingering/baby weight?)
The rings from a 20 oz. plastic pop bottle
OR the rings from a gallon of milk, depending on how big you want your earrings
Earring wires
Needle nose pliers

With a slip knot made, and behind the ring; put your hook through the ring and grab the slip knot. Then do 20 sc in ring. Ch 3 (this is where you will hang the earring wire), 20 sc in ring. Join to first sc. Weave in end. With needle nose pliers, pull the little hoop away so you can put the ch 3 part through. Make sure you have the earring and the circle parts both facing the way they should go. After getting the ch 3 part in, with your pliers, tighten the loop back together. You're done. :)  Make one more.

For the milk rings, I did 25 sc, ch 3, 25 sc.

Two pairs with plastic pop bottle rings.

Milk gallon on the left, next to the pop bottle one. So you can see how much bigger it is.  These were all the plastic rings I had saved. I need to start saving more. Just a little recycling, but hey...  :) 
You can sell your earrings made from this pattern. But the pattern is free and is not to be re-sold. Thanks and Have Fun.

Tuesday, February 22, 2011

Bed Bugs

I made these up about ten years ago, when our oldest was about 8 or 9 years old. (He will be 19 in a little over a month..) It was before Pillow Pets were around. Well when our youngest recently was asking for a Pillow Pet, I kept saying to myself (every time he would ask, lol) "I wonder if I ever wrote down the pattern for those 'Bed Bugs' I made?"...  Well I found the pattern the other day, and made one up for him.   (He has since then gotten a Pillow Pet, but... Now he has a "Bed Bug" too. :P)   Now when you say "Good night. Sleep tight. Don't let the bed bugs bite", they will be able to cuddle with their bed bug. :P    (More pictures below) 

Size J hook (for Bed Bugs body only)
H hook (for everything else)
Worsted Weight yarn (I used Red Heart Super Saver)
About 7 oz.(not sure, but just to be safe?) for the body color, 3 oz. for legs/stripe/etc., small amounts in other colors for "spots"
 
Bed Bug Body
(Make two sides)
With J hook and body color, ch 11. Skip first chain, sc in each remaining chain. Ch 1, turn. (10 sc)
Row 2: 2 sc in first sc. Sc in next 8 sc, 2 sc in last sc. Ch 1, turn. (12 sc)
Row 3: Sc in each sc. Ch 1, turn.
Row 4: 2 sc in first sc, sc in next sc. (2 sc in next sc, sc in next sc) across. Ch 1, turn. (18 sc)
Row 5: Repeat row 3.
Row 6: Repeat row 4. (27 sc)
Row 7-11: Repeat row 3.
Row 12: Repeat row 2. (29 sc)
Row 13-14: Repeat row 3.
Row 15: Sc first 2 sc together, sc across to last 2 sc. Sc last 2 sc together. Ch 1, turn. (27 sc)
Row 16-19: Repeat row 3.
Row 20: Repeat row 15. (25 sc)
Row 21: Repeat row 3.
Row 22-23: Repeat row 15. (21 sc)
Row 24: (Sc first 2 together, sc in next sc) across. Ch 1, turn. (14 sc)
Row 25-26: Repeat row 15.  (12, 10 sc) At end of row 26,do not fasten off. Ch 1, (sc 25 sc evenly across side of body, and 10 sc in end rows of body.) Repeat once.  Join and fasten off, leaving a long length on one of the sides to sew body pieces together with.

Legs
(Make four)
With H hook and leg color, and leaving a long length to sew onto body later, ch 8. Sl st to join. Ch 1, do not turn. (Note: Marking the first stitch of each round, do not join. Ch 1 and begin next round) Rounds 1-3: Sc in each sc.
Round 4: (2 sc in next sc, sc in next sc.) around. 2 sc in last sc. (You will be doing 2 sc in each of the last 2 scs in this round. Join rounds from here on.) (13 sc)
Round 5: 2 sc in first sc, sc around to last sc. 2 sc in last sc. (You are forming the front of the foot.) (15 sc)
Round 6: Repeat round 4. (23 sc)
Round 7-8: Repeat round 5. (25, 27 sc)
Round 9: Sc in each sc around.
Round 10: Sc 2 together around w/ sc last & first sc of next round together. (14 sc)
Round 11: Sc 2 together around. (7 sc) Fasten off don't forget to leave a little length to gather the bottom of the foot together and secure. Stuff foot and sew to sides (just below join point) on body.

Lightning Bug & Lady Bug (not pictured) Spots
(Make five or more)
With H hook & spot color, ch 3. Skip first chain, sc in each remaining chain. Ch 1, turn. (2 sc)
Row 2: 2 sc in each sc. Ch 1, turn. (4 sc)
Row 3: 2 sc in first sc, sc in next 2 sc, 2 sc in last sc. Ch 1, turn. (6 sc)
Row 4: Sc across. Ch 1, turn.
Row 5: Sc 2 together across. Ch1, turn. (3 sc)
Row 6: Sc 2 together. Sc in last sc.(2 sc)  Do not fasten off. Ch 1 and sc 17 evenly around spot. Join and fasten off, leaving a long length to sew spot onto body.   (I would sew the stripe on-instructions below- before sewing on the spots.) Sew onto body, stuffing lightly.

Love Bug Hearts
(Make two-or more, if you like)
With H hook and heart color, ch 2. Sc in 2nd chain from hook. Ch 1, turn. (1 sc)
Row 2: 3 sc in sc. Ch 1, turn. (3 sc)
Row 3: 2 sc in first sc. Sc in next sc. 2 sc in last sc. Ch 1, turn. (5 sc)
Row 4: 2 sc in first sc. s in each sc til last sc. 2 sc in last sc. Ch 1, turn. (7 sc)
Row 5: Sc in each sc. Ch 1, turn.
Row 6: Sc first 2 sc together, sc in next 2 sc. Leave remaining sc undone, ch 1, turn. (3 sc)
Row 7: Sc first 2 sc together, sc in next sc. Ch 1, turn (2 sc)
Row 8: Sc 2 together. Fasten off.
Join yarn in opposite side at outside of heart edge. Ch 1, sc first 2 sc together. Sc in next sc. Ch 1, turn. (2 sc)
Row 2: Sc in each sc. Ch 1, turn.
Row 3: Sc 2 together. Do not fasten off. Ch 1. (Mark first sc) 3 sc in inside of "V", sl st in "V", 3 sc in opposite side of "V", 8 sc along outside edge, 3 sc in "point" of heart, 8 sc along opposite side. Join to first sc and fasten off, leaving a long length to sew onto body with, stuffing lightly.

Zig-Zag "Lightning Stripe"
With H hook and stripe color, ch 34. Sc in 2nd chain from hook and in next 6 chains. 3 sc in next chain. Sc in next 7 chains. Sc next 3 chains together. Sc in next 7 chains. 3 sc in next chain. Sc in next 7 chains. Fasten off, leaving a long legth to sew stripe onto body.

Love Bug & Ladybug Stripe
With H hook and stripe color, ch 24. Sc in 2nd chain from hook and in each remaining chain. Fasten off, leaving a long length to sew stripe onto body.

Nose(s)
With H hook and nose color, ch 2. 6 sc in 2nd chain from hook. Join and fasten off, leaving a long length to sew onto face. (I glue the eyes on first. Or if you are making for a small child, you could use a yarn needle and embroider eyes on)

Antennae
(Make two)
With H hook and antennae color, ch 8. 4 sc in 2nd chain from hook. Sl st in each remaining chain and fasten off, leaving a length to attach antennae to head with.  

I haven't made the Ladybug one yet, but I am working on it. I want to make one with the hearts. If you want a traditional ladybug (although I am not sure how many legs real ladybugs have, but... this is a toy, right? :P) you could use the "spots" instead.    


Zig Zag Stripe on Lightning Bug

Love Bug

Hearts & Stripe

Thursday, June 24, 2010

Bigger Hamster Tube

I made a bigger one for the Dwarf Teddy Bear Hamster.
Same as the Hamster Tube, just chained 34 instead of 24. :)

Hamster Tube

I wanted to crochet something for one of our hamsters (we have 3). I already crochet a Hamster Hut for one of them. But this one likes to sleep in the toilet paper roll tubes we put in her cage (to chew on--which she also does..). So I thought why not crochet her a tube?

Here she is inside it. :P She's a Russian Dwarf Hamster. Her name is Oak. She's super tiny! I will have to make bigger tubes for the other two hamsters (they're Dwarf Teddy Bear Hamsters, but still a lot bigger than her!). Edited to add: I made a bigger tube.

Here she is, checking it out. It was hard to get a good picture of her, she kept running around so fast. :P

To crochet the tube, I used:
G hook
Worsted Weight cotton yarn (Peaches n' Cream, or Sugar n' Cream)
Ch 24. Join to make a ring. Ch 1, sc in each chain around. Ch 1, turn.
Round 1: Sc in each sc around. Ch 1, turn.
Repeat round one until your tube is as long as you like. Fasten off and weave in ends.
I want to make some really long ones, for them to play in. :P


Saturday, April 10, 2010

Cupcake Hot Pad

H hook
Worsted Weight Yarn: Brown, and pink (I used acrylic for this one, I had big 7 oz skeins, so... not sure how much you would need when using cotton. I would probably get two balls of each, just to be sure.)
Plastic ring from a pop bottle (for hanging ring, optional)

*Note: Sc in back loops only (BLO) for brown part of cupcake.
When crocheting around ring of pop bottle, it works best if you try to crochet as tightly to the previous crochet as possible. I kind of push it over with my fingers as best as I can.
Also this pattern has not been tested and this is the only one I've made so far (I made it up for a swap package.) So if there are any errors, please let me know by leaving a comment.

With brown, ch 15. Sc in 2nd ch from hook and in each ch across. Ch 1, turn.
Rows 2-26: Sc in BLO of each sc across. Ch 1, turn. At end of row 26, should measure approx. 6 1/4" across. Fasten off.

Join pink in end of row where you just fastened off. Ch 1, sc in same space, and in end of each row. (26 sc) Ch 1, turn.
Row 2: Sc in each sc across. Ch 1, turn.
Row 3: Sc first 2 sc tog, sc across til 2 sc remain. Sc last 2 sc tog. (24 sc) Ch 1, turn.
Rows 4 & 5: Repeat row 2.
Row 6: Repeat row 3. (22 sc)
Row 7 & 8: Repeat row 2.
Row 9 & 10: Repeat row 3. (20 sc, 18 sc)
Row 11: Sc first 2 tog. *Sc in next 2 sc, sc next 2 sc tog, repeat from * across. (13 sc)
Row 12: Repeat row 3. (11 sc)
Row 13: Sc first 2 sc tog. *Sc in next sc. Sc next 2 tog. Sc in next sc. Repeat from *. (7 sc) Fasten off.
Make two.
Holding both pieces with wrong sides together, and with brown, join with a sl st on left side of cupcake. Sc two pieces together, joining pink for icing part, and sc in any available space to joing tops together. Fasten off.

Hanging Ring: With pink, crochet 25 sc evenly around. Join with a sl st to first sc. Fasten off, leaving a longish length to sew ring onto top of cupcake. Starting at the third sc from right on top of cupcake, and into next 2 sc, sew ring securely on. With yarn to the back side of the cupcake, pull through a loop and make a slip knot to end off. Weave end in. Weave in any other loose ends and you are done.

**This is a free pattern, and cannot be reproduced for sale anywhere.**
If you can find a buyer for your finished hot pad, you are welcome to sell it locally at craft shows/ whatever. The pattern however is free and is not to be sold. Thank you.

Friday, January 22, 2010

Classroom Kleenex Box Cover


This idea is about nine or ten years old... :P When our two oldest kids were in elementary school, I thought it would be a good idea to make something like this for their teachers/classroom. (What teacher on earth does not need a kleenex box in their classroom?...) Anyway, you will need:


Worsted weight yarn (I used Red Heart Super Saver in 'Aruba Sea') main color 7 oz skein (you won't need the whole thing, but that's what I had... Small amount black, even smaller amount grey, even smaller amount white. :P

G hook

yarn needle


Basic box cover:

With main color, ch 16, sc in 2nd ch from hook and in each ch across. (15 sc) Ch 1, turn

Rows 2-22: Sc in each sc across. Ch 1, turn. At end of row 22, fasten off.
Make 4 sides. Holding wrong sides together, sc two sides together. Repeat, until all sides are crocheted. Sc or sc backwards all around the bottom edge, crocheting over loose ends as you go. Fasten off and weave in end.
Top Section:
1: Ch 19, sc in 2nd ch from hook & in each ch across. Ch 1, turn.
2-8: Sc in each sc across. Ch 1, turn.
9-10: Sc in next 7 sc. Ch 1, turn. At end of row 10, fasten off. Do not turn work. Skip 4 sc, join yarn w/ sl st in 5th sc. Ch 1, sc in each of next 7 sc. Ch 1, turn.
11: Sc in next 7 sc, ch 4, sc in next 7 sc. Ch 1, turn. (This c reates the opening for kleenex.)
12: Sc in each of 7 sc, each of 4 chs, and each of next 7 sc. Ch 1, turn.
13-19: Sc in each sc across. Ch 1, turn. At end of row 19, do not fasten off, do not turn. Ch 1, sc evenly top edge to bottom edge, w/ 3 sc in each corner. I went with however many stitches there were on the bottom part. This meant doubling up a couple of the top stitches w/ the bottom ones.. Join to 1st sc. Fasten off and weave in end.
"Blackboard"
W/ black, ch 10. Sc in 2nd ch from hook and in each ch across.. (9 sc). Ch 1, turn.
2-15: Sc in each sc across. Ch 1, turn. At end of row 15, fasten off.
W/ grey, attach to corner space w/ sl st. Ch 1, 2 sc in same space. *Sc in 9 sc across, 2 sc in corner space, 14 sc evenly along side, repeat from *. Join w/ sl st to 1st sc. Fasten off, leaving a long tail to sew onto kleenex box cover.
W/ white and yarn needle, using backstitch, embroider letters A, B, and C on top of blackboard, numbers 1, 2, and 3 on the bottom. Make a separating line in between. (Hopefully your embroidery is a lot better than mine LOL) I was thinking, maybe if you could find some A, B, and C appliques, you could sew/glue those on, too. ~~Happy Crocheting!~~ :)