Ami Love Bug
 Here is another one, in blue I have done... It's Mr. & Mrs. Love Bug, having a cup of tea... :P
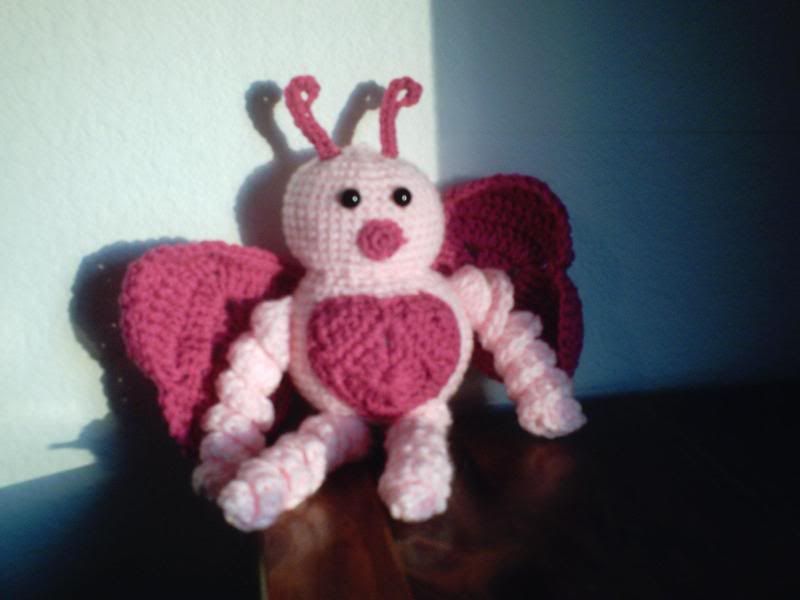
Well here is my very first amigurumi. (One I made up on my own, anyway...) You will need ?? I don't know, 3 oz. of the main color in a worsted weight. (I used Red Heart) And less than that probably of the contrasting color. I'm not sure on the amounts. I had two big skeins (7 oz.) And a G hook. Also I used little lock on eyes. And a big yarn needle to sew everything on.
Do not join at ends of rounds. Place a marker in the first stich of each round.
Body/Head:
Round 1: With main color, ch 2. 6 sc in 2nd ch from hook.
Round 2: 2 sc in each sc.. (12sc)
3: *2 sc in 1st sc. Sc in next sc. Repeat from * around. (18 sc)
4: *2 sc in 1st sc. Sc in next 2 sc. Rep from * around. (24 sc)
5: *2 sc in 1st sc. Sc in next 3 sc. Rep from * around. (30 sc)
6: *2 sc in 1st sc. Sc in next 4 sc. Rep from * around. (36 sc)
7: *2 sc in 1st sc. Sc in next 5 sc. Rep from * around. (42 sc)
8-17: Sc in each sc.
18: *Sc 2 together, sc in next sc. Rep from *. (28 sc) Stuff body.
19: Sc 2 tog around. (14 sc) Finish stuffing as much as you can.
(Start head)
20: 2 sc in each sc around. (28 sc)
21: *Sc in next 2 sc, 2 sc in next sc. Rep from *, ending w/ a sc in last sc. (37 sc)
22-29: Sc in each sc.
30: *Sc 2 tog, sc in next 2sc. Rep from *, ending w/ a sc in last sc. (28 sc)
31: *Sc 2 tog, sc in next sc. Rep from *, ending w/ a sc in last sc.(19sc) (Place eyes between rows 27 &28, 4 stitches apart, and stuff.)
32: Sc 2 tog around, w/a sc in last sc. (10 sc)
33: Repeat row 32. (5 sc) Fasten off, leaving a length, and pull through remaining stitches and tighten. Weave in loose end.
Wings (Make two):
With contrasting color, ch 4. Join w/ sl st to first ch to make a ring. Ch 5, 3 dc in ring. *Ch 2, 3 dc in ring. Rep from * one more time. Ch 2. 2 dc in ring. Join w/ sl st to 3rd ch of ch-5.
Round 2: Ch 3, 2dc, ch 1, 3dc, all in same space. *Dc in each dc, (3 dc, ch 1, 3 dc) in corner spaces. Repeat from* around, ending w/ a dc in last 3 dc.. Join w/ sl st to 3rd ch of beg ch 3.
(Now you will be making the 'bumps' on the heart)
Row 1: Sl st to corner. Ch 2, hdc in corner space. Hdc in each dc. 2 hdc in corner space. Ch 1, turn. (one side of granny square worked.)
2: Sc 1st 2 tog. Sc across to last 2. Sc last 2 tog, skipping the beginning ch 2 of row 1. (9 sc)
3-5: Rep row 2. You will have 7, 5, and 3 stitches at end of each row. At end of row 5, fasten off. Join yarn in corner space to the right of side just worked. Repeat 1st side. (Yu will only work on hdc in corner space where you already worked 2 hdc for first side, and only work one hdc for the first row instead of two.) Join yarn in "point" of heart (corner space) w/ sl st. Ch 1. 3 sc in same space. Sc evenly all around, w/ a sl st in "V" of heart. Sc evenly around other side. Join w/ sl st to first sc. Leaving a length to sew onto body, fasten off.
Heart for front of body:
Work first row of wing (basically a granny's daughter).
1: Sl st to corner space. Ch 1, 2 sc in same space. Sc in each dc. 2 sc in next corner space. Ch 1, turn.
2: Sc 1st 2 together, Sc in next 3 sc. Sc last 2 tog. Ch 1, turn. (5 sc)
3: Sc 1st 2 tog, sc in next sc, sc last 2 tog. Ch 1, turn.
4: Sc all 3 tog. Fasten off. Join yarn w/ sl st in ch-2 corner space to the right of side just worked. Repeat as first side.
Join yarn in 'point' of heart (corner space), 3 sc in same space. Sc evenly all around, w/ a sl st in 'v' of heart. Sc evenly around other side, join and fasten off, leaving a length to sew onto body.
Nose:
Ch 2, 6 sc in 2nd ch from hook. Join, fasten off leaving a length to sew onto face.
Legs (Make four):
Ch 23. 3 dc in third ch from hook, and in each ch across. Fasten off, leaving a length to sew onto body with.
Antennae (Make two):
Leaving a length to sew onto head, ch 8. 4 sc in 2nd ch from hook. Sl st in next 6 chains. Fasten off. (I use two loose ends to kind of tie to the head, if you can hide the knot somehow. Then sl st a couple/few times to the head. Pull loose ends into head.)
posted by Tina at
5:28 PM
![]()


20 Comments:
That is so cute, thanks
Penny
By Penny, at 2:04 AM
I agree! cute!! Can't wait to try it, though I know it will never look as good!
By Misha, at 11:41 AM
I love it and plan on making a couple today....my mom wants two to represent AJ and Aiden. LOL
By Dragonflymom, at 10:39 AM
We are doing this on Ravelry as a CAL. I am looking forward to it.
Cora
By Unknown, at 4:11 PM
Hello. Thank you for such a cute pattern! I just started making "toys" and love it! My youngest daughter is getting married in August. I think I will make her and Brian a pair of these!
By J. Hunter, at 5:16 AM
First time on your blog...You have so many new and nice crochet patterns here..will keep visiting ur blog
By EC, at 10:32 PM
I made one for my nephew who turns one this month and one for my best friend's son, my 3 year old daughter then had to have one too! And I just now finished one for my other best friend's son!
By Unknown, at 1:06 AM
These are so cute! I'll have to make some of these for my daughter for Christmas!
By Jennifer White, at 3:02 PM
Love to try this. Where do you get the lock on eyes?
By Pam, at 8:45 PM
Pam I am sorry I don't check back here very often. I got the lock-on eyes at either Hobby Lobby or JoAnns. Last time I checked at JoAnns, though; their selection was getting pretty slim. :( HTH
By Tina, at 9:20 PM
I love all your patterns. I have only tried this one so far, but have planned to try others as soon as possible. They are so easy to follow and have helped me get beyond the Granny Square. Thank you so much for sharing!:)
Squish~
By Squish, at 2:50 PM
I keep having to make more. People see them and want one or siblings want one. Thank gosh they are so easy to make up and fast! Love them! Making 2 now now my new niece and nephew's first birthdays!
By Unknown, at 8:35 AM
Well I do hope you're not insulted--you see, I just can't resist making this for my little Yorkie, Willoughby. It is such an adorable pattern. Thanks! Arrf! Arrf!(thanx in Yorkie).
By Anonymous, at 6:47 PM
Hello,
I added this project and thumbnail to our site and linked to you. We are looking for more amigurumi patterns as well as other crochet patterns, so if you have any similar projects please feel free to let me know.
Thanks,
Christine
cweiher@primecp.com
Editor, www.AllFreeCrochet.com
By Sarah, at 1:09 PM
Squish, a, D, and Sarah~ Thank you for your comments. I would love to see any that you all have made.
D, I am not insulted at all that you made one for your Yorkie. It's an honor! :)
Sarah, I have another "bug" pattern I am working on right now. I hope to get it up here soon. I have three different versions of it. And only one is finished right now. :P
By Tina, at 1:17 PM
These are adorable. Thanks so much for sharing the pattern.
Love Joan xx
By Foxycrafts, at 5:56 AM
This comment has been removed by a blog administrator.
By parabellum, at 5:56 AM
I think this is sooo cute but, Where do you place the wings
By Unknown, at 5:06 PM
help having trouble with the wings of the instructions. Do I stop where it says the bumps one side granny square worked. very confusing. can you help-please!
By Linda Barnes, at 5:06 PM
Anonyous and Linda, I am so sorry. I don't come on here very often.. I am crocheting one today and I will try and update the pattern to make more sense! I haven't crocheted one of these in a long time. Thank you all for your comments and how exciting you did it as a CAL, Anonymous!
By Tina, at 5:13 AM
Post a Comment
<< Home